cOOPer

Developer Guide
Introducing cOOPer
Welcome to cOOPer’s Developer Guide!
cOOPer is a Command Line Interface (CLI) desktop application developed to simplify administrative processes of tech startups such as communication and finance management.
cOOPer was developed in Java 11 following an Object-Oriented Programming (OOP) paradigm, hence the letters OOP in its name.
This developer guide is for software designers, developers, and software testers of cOOPer. It will be your reference manual if you are looking to:
- Know more about cOOPer’s internal software design
- Improve cOOPer’s internal software design
- Add more features to cOOPer
- Enhance cOOPer’s existing features
- Perform software testing on cOOPer
What’s in this Developer Guide
- How this Developer Guide Works
- Acknowledgements
- Setting Up and Getting Started
- Design
- Implementation
- Appendix: Requirements
- Appendix: Instructions for Manual Testing
How this Developer Guide Works
Throughout this developer guide, you will see text formatted differently from normal text, as well as symbols appearing before another line of text. The table below explains the formatting and symbols in this developer guide.
| Formatting/Symbol | Meaning |
|---|---|
| italics | Text in italics represent terminology specific to using / developing cOOPer. |
| bold | Text in bold emphasizes the text’s importance and indicates that you should pay more attention to the text. |
code |
Short lines of text highlighted as such indicate a class, method, component or user input. It is also used to represent directories / file paths. |
| ℹ️ | The info symbol indicates useful information about diagrams / content in this developer guide. |
| 💡 | The light bulb symbol indicates a useful tip which eases the development of cOOPer. |
Acknowledgements
This section includes the sources of code, documentation and third-party libraries reused / adapted in developing cOOPer.
- The dopsun chatbot-cli is a third-party library used to ease the parsing of user input.
- The implementation of the
Storagecomponent was adapted from one of our member’s CS2113T Individual Project (iP). A few of the methods for file reading and file creation were reused. - The implementation of the PBKDF2 algorithm for storing passwords was adapted from this website. The two methods for generating the hash as well as obtaining the salt were reused, but tweaked slightly in our implementation.
- The method used to convert an input stream to a file in
Util.javawas adapted from this website. - The method used to make a POST Request to an online LaTeX compiler for the
generatefeature was adapted from this website. - JUnit 5 is a third-party library used to perform software testing for cOOPer.
Setting Up and Getting Started
💡 These are the software / tools used in developing cOOPer. You are recommended to use them too:
- IDE: IntelliJ IDEA (highly recommended)
- JDK: Java 11
- Version control: Git
- Git GUI: Sourcetree
- Build system: Gradle
Setting up cOOPer on your computer
- Fork this repo and clone the fork into your computer.
- If you are using IntelliJ IDEA, ensure that IntelliJ is configured to use JDK 11. You can refer to IntelliJ’s own documentation here to correctly configure the JDK.
- Import the project as a Gradle project. You can follow this guide to find out how to import the project into IntelliJ.
- Verify the setup by running
cooper.Cooper- Navigate to
src/main/java/cooper/Cooper.java - Right click on
Cooper.javaand select ‘Run Cooper.main()’. - You should see the following output if the setup was done correctly:
- Navigate to
            /$$$$$$   /$$$$$$  /$$$$$$$
           /$$__  $$ /$$__  $$| $$__  $$
  /$$$$$$$| $$  \ $$| $$  \ $$| $$  \ $$ /$$$$$$   /$$$$$$
 /$$_____/| $$  | $$| $$  | $$| $$$$$$$//$$__  $$ /$$__  $$
| $$      | $$  | $$| $$  | $$| $$____/| $$$$$$$$| $$  \__/
| $$      | $$  | $$| $$  | $$| $$     | $$_____/| $$
|  $$$$$$$|  $$$$$$/|  $$$$$$/| $$     |  $$$$$$$| $$
 \_______/ \______/  \______/ |__/      \_______/|__/
=========================================================================
Hello I'm cOOPer! Nice to meet you!
=========================================================================
Log in or register to gain access to my features!
To log in, enter "login [yourUsername] /pw [password] /as [yourRole]".
To register, enter "register [yourUsername] /pw [password] /as [yourRole]".

To exit, enter "exit".
=========================================================================
>> [Logged out]
- Run JUnit tests (optional):
- Navigate to
src/test. - Right click on
testand select ‘Run ‘All tests’ ‘. - All the tests should pass, and you should see the following:
- Navigate to

Before you code
- Configure coding style
If you are using IntelliJ IDEA, follow this guide to set up IntelliJ to match our coding style. - Set up Continuous Integration (CI)
GitHub automatically detects the GitHub Actions config file located in the.github/workflowsfolder. CI for cOOPer is automatically run at each push to the ‘master’ branch or whenever a pull request is created. - Get to know cOOPer’s design
One last thing to know before you start coding is cOOPer’s overall software design. You are recommended to get some sense of cOOPer’s overall design in the Design section below.
Design
💡 The architecture diagram and UML diagrams in this document were created using draw.io. The
.pngtemplates used to create the diagrams can be found in thedeveloperGuideDiagramsfolder. To create and edit diagrams, access the draw.io website, select ‘Open Existing Diagram’ and open the desired.pngfile. Any changes to the diagram will be saved automatically.
Overview
cOOPer consists of two main layers: the verification layer and the features layer as shown in the diagram below. cOOPer recognizes different sets of inputs at each layer.
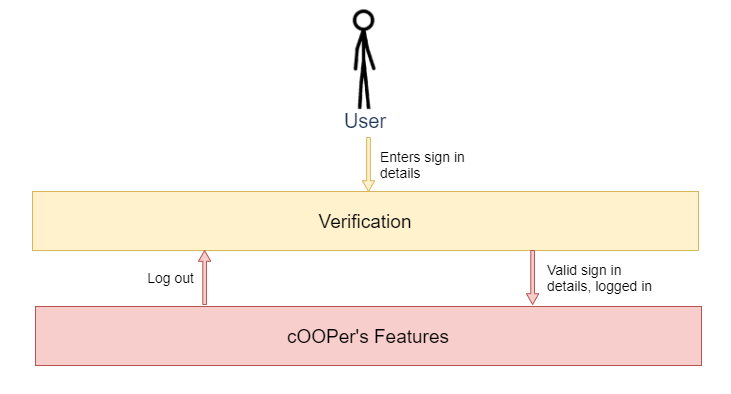
Upon launching the app, the user starts at the verification layer where they can only log in or register.
Entering valid credentials will then grant the user access to the features layer where they can input commands to use cOOPer’s features.
At this layer, entering the logout command will bring the user back to the verification layer.
Architecture
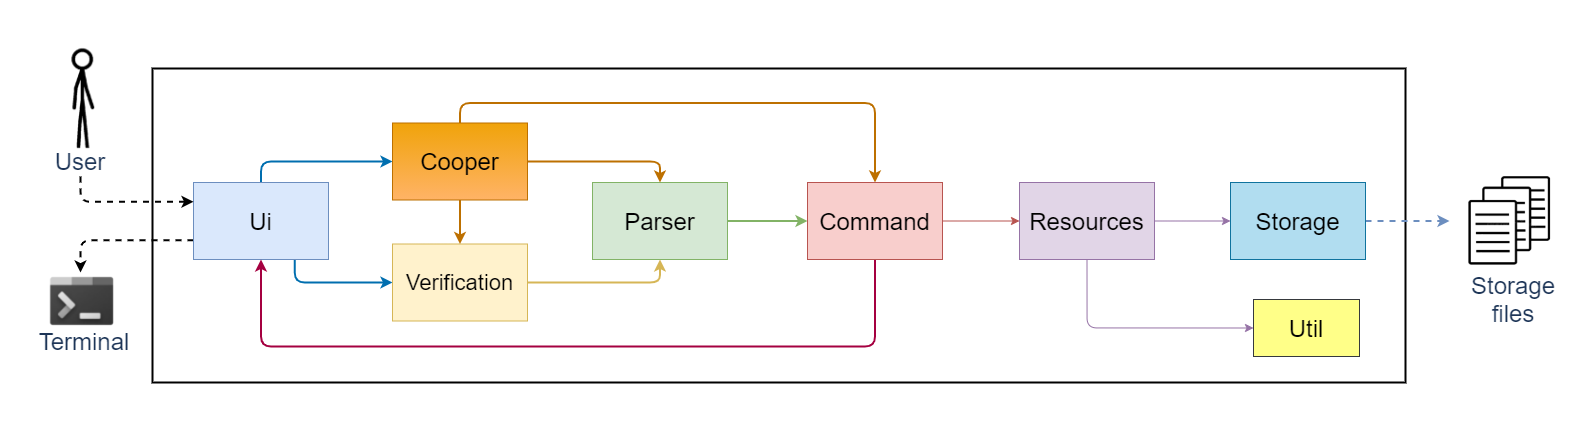
The Architecture Diagram above shows the high-level design of cOOPer and how cOOPer’s components are connected.
Cooper contains the main method of the program. Cooper’s responsibilities are as such:
- Upon launching the app,
Cooperinitializes the components and loads stored user data into the components. - While the app is running,
Cooperreads user input which is then processed by the components to produce a result. - Upon shutting down the app,
Coopershuts down the components and performs cleaning up where necessary.
Apart from Cooper, the rest of the app consists of these seven components:
Ui: Handles the reading of user input and printing of messages to the terminal.Parser: Interprets and validates user input.Verification: Verifies that the user is signing in to cOOPer with valid credentials.Command: Executes commands which are parsed from user input.Resources: Manages data for cOOPer’s finance, meetings and forum features while the app is running.Storage: Loads data from, and saves data to storage files in the computer hard disk.Util: Provides utility which help with some of cOOPer’s features.
Interaction of the architecture components to process user input
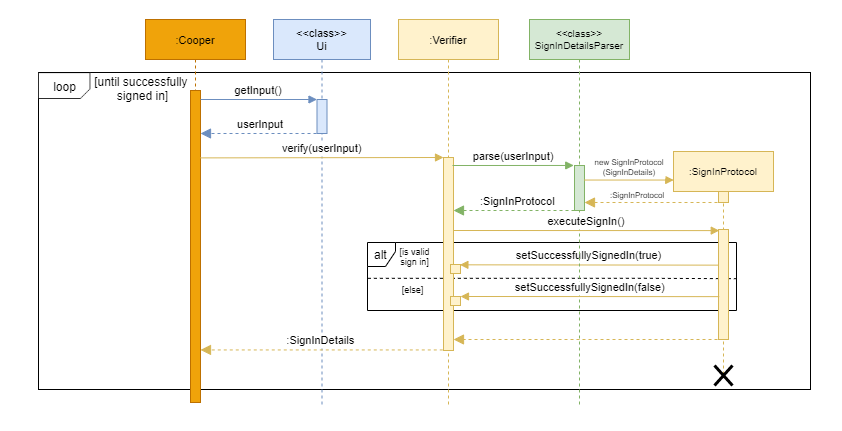
- The sequence diagram below provides a general overview of how cOOPer’s components interact with each other when a user enters their sign in details at the verification layer.
ℹ️
userInputrepresents the credentials input by the user for verification. For example,register John /pw 12345 /as admin.
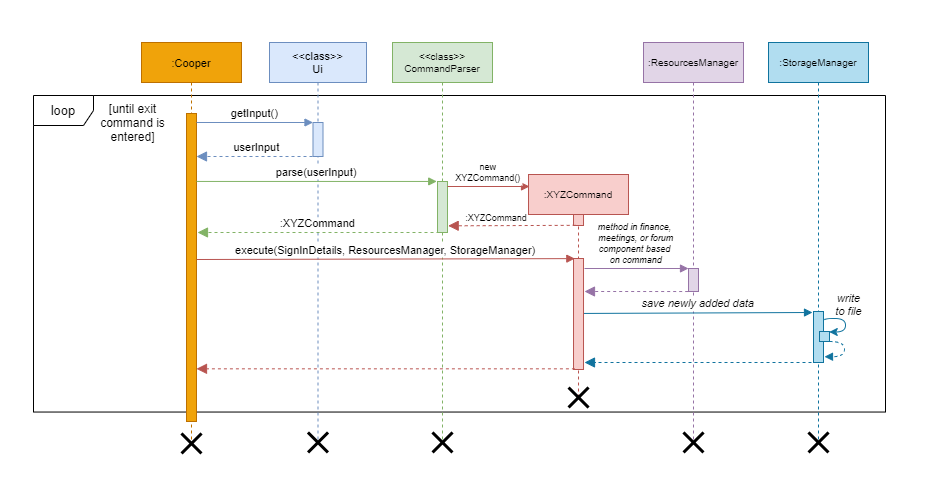
- The next sequence diagram below provides a general overview of how cOOPer’s components interact with each other when a user enters a command at the features layer.
ℹ️
userInputrepresents a command input by the user. For example,meetings.
ℹ️XYZCommandis an object representing a command recognised by cOOPer. For example,MeetingsCommand.
Ui Component
API: cooper.ui
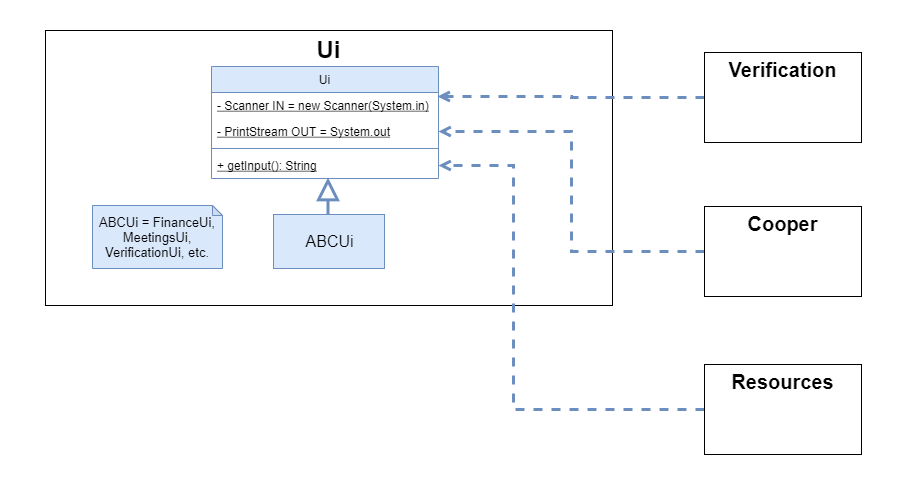
- The
Uicomponent consists of a parentUiclass and its subclasses as shown by the class diagram above. - The parent
Uiclass contains general constants and methods used across cOOPer’s components which read user input and print recurring messages. - On the other hand, the subclasses for the different components in cOOPer (
ABCUi) contain constants and methods specific to the function of that component. For example,FinanceUicontains a methodprintBalanceSheet()which prints a balance sheet formatted with headers containing the entries input by the user. - The classes in the
Uicomponent have static methods soCooperdoes not need to contain a reference toUi.
The Ui component:
- Reads in user input from the terminal.
- Prints status messages, error messages and messages prompting the user for input.
- Displays a label besides cOOPer’s prompt to indicate which stage of cOOPer the user is in. For example, the
[Logged out]label indicates that the user is currently logged out of cOOPer. - Is used by
VerificationandCoopermainly for reading user input, while it is used byResourcesmainly for printing output messages.
Parser Component
API: cooper.parser

- The
Parsercomponent consists of an abstractParserBaseclass with its subclasses,CommandParserandSignInDetailsParser. - To emphasize the different layers of cOOPer, different types of objects are constructed from user input at different layers.
User input at the verification layer will be parsed to construct a
SignInProtocolobject while user input at the features layer will be parsed to construct aCommandobject. - The
SignInProtocolobject executes the signing in of the user with details provided while theCommandobject executes the command input by the user. ParserBasecontains a reference to theParserinterface from the dopsun chatbot-cli library used by cOOPer. More information about cOOPer’s implementation of the library can be found here.
The Parsercomponent:
- Constructs and returns a new
SignInProtocol/Commandobject with the correct parsed attributes. - Determines if user input corresponds to any of the commands recognised by cOOPer.
- Validates user input by checking for erroneous command arguments. For example, empty command arguments or entering alphabets where an integer is expected are regarded as erroneous arguments.
- Does not perform any printing of error messages, but instead throws
InvalidCommandFormatException,UnrecognisedCommandExceptionetc. to signal erroneous input.
Verification Component
API: cooper.verification
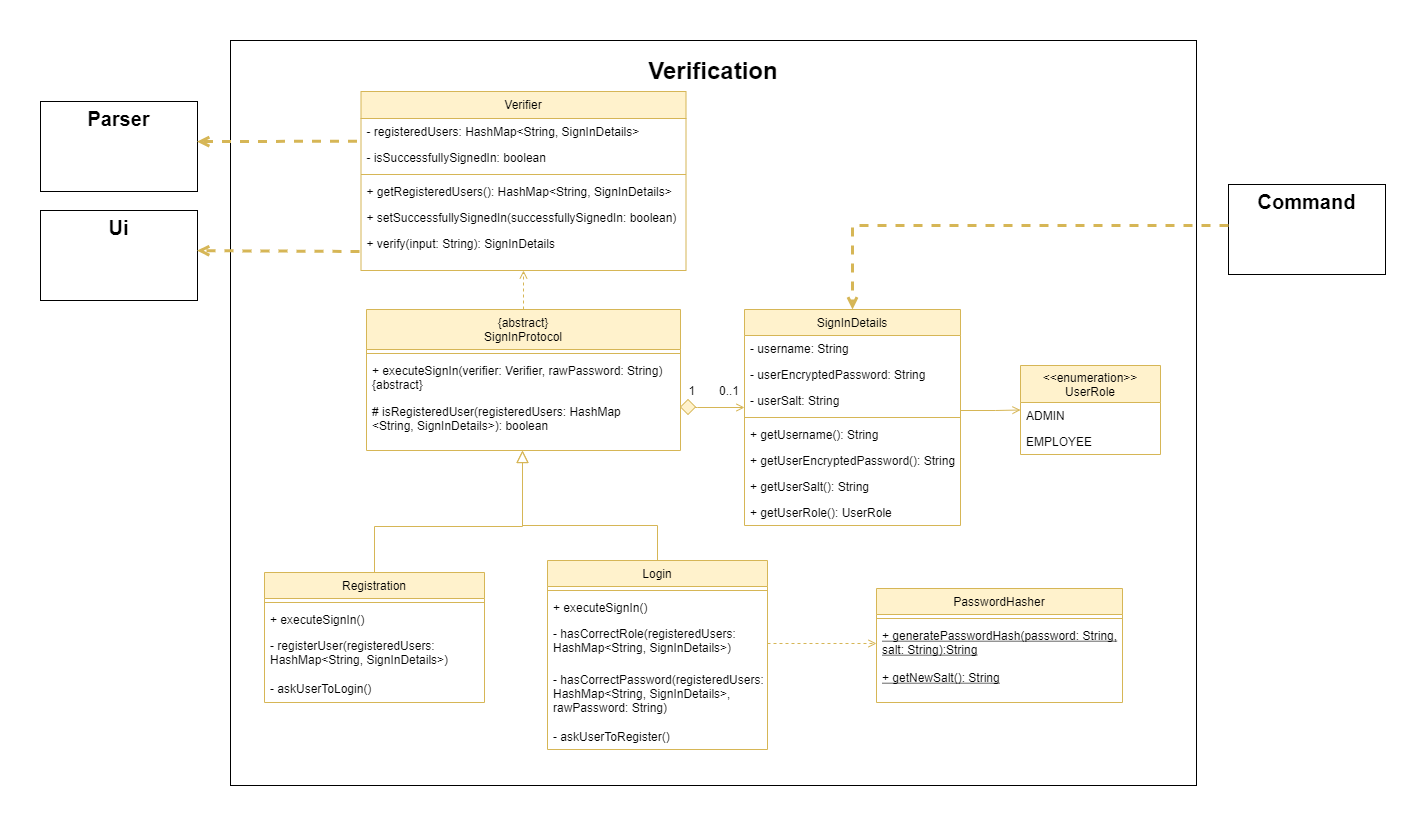
- The
Verificationcomponent consists of aVerifierclass which contains the list of registered users and methods to verify user credentials. - The
SignInProtocolclass is an abstract class representing one of the two sign in protocols,LoginorRegistration. - The
SignInProtocolclass contains a reference to aSignInDetailsobject which as a whole, represents a sign in attempt by the user using one of the two protocols, with the correspondingSignInDetails. For example, aLoginobject containingSignInDetailsXrepresents the user’s login attempt with the detailsSignInDetailsX. LoginandRegistrationoverrideSignInProtocol’s abstract method,executeSignIn()as there are different conditions to check depending on whether the user is trying to log in or register. More on the verification process can be found here.
The Verification component:
- Verifies that the user is signing in to cOOPer with valid credentials.
- Grants the user access to the features layer if the user’s credentials are valid. A user with valid credentials means the user is logging in to cOOPer with the same username, password and role they registered with.
Command Component
API: Command.java
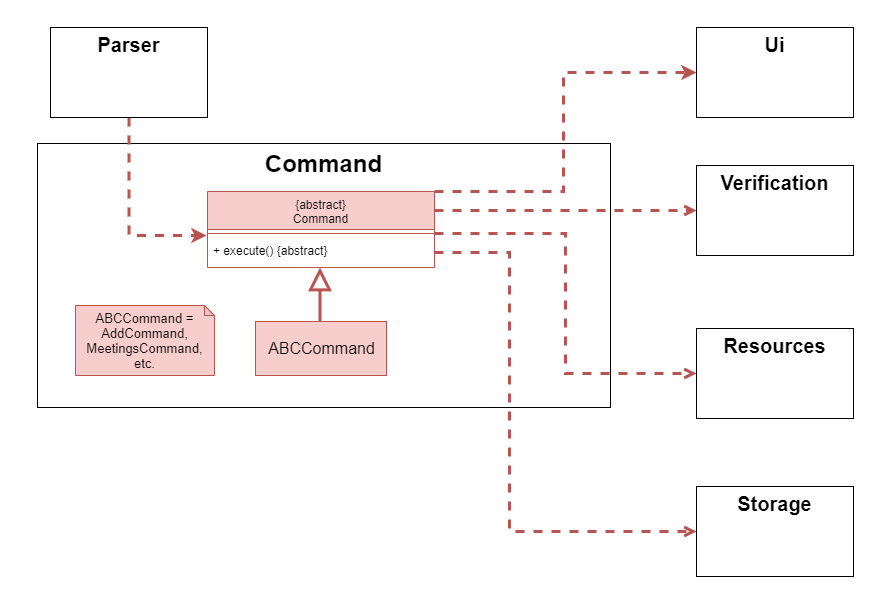
- The
Commandcomponent consists of an abstractCommandclass and its subclasses as shown in the diagram above. - Each subclass (
ABCCommand) overridesCommand’s abstract method,execute()and has its own unique implementation of the method based on how the command is to be executed. - This makes the addition of a new command to cOOPer relatively easy. For example, you can define a
HelloCommandwhich prints outHello world!by inheriting fromCommandand implementing theexecute()method as such:
public class HelloCommand extends Command {
	// constructors and attributes for execution of the command are omitted
	public void execute() {
		System.out.println("Hello world!");
	}
}
- Some subclasses contain extra attributes which are parsed from the arguments in the user input.
- These attributes aid in the execution of the command.
For example, the
ScheduleCommandcontains aStringrepresenting the meeting name as well as anArrayListrepresenting the users associated with that meeting. - The
execute()method takes in aSignInDetailsobject as a parameter. This object represents the sign in details of a user who has successfully signed in to cOOPer. For some of cOOPer’s finance / meetings features which are only accessible by an admin, theUserRoleattribute of thisSignInDetailsobject is checked to grant correct access to the feature.
The Command component:
- Executes a command entered by the user
- May make changes to the objects in the
Resourcescomponent depending on the command. - Performs the storage of data via the
Storagecomponent if there is any change to the data after the command is executed successfully. - Prints status messages or error messages to the output via the
Uicomponent to inform the user of the status of command execution.
Resources Component
API: cooper.resources
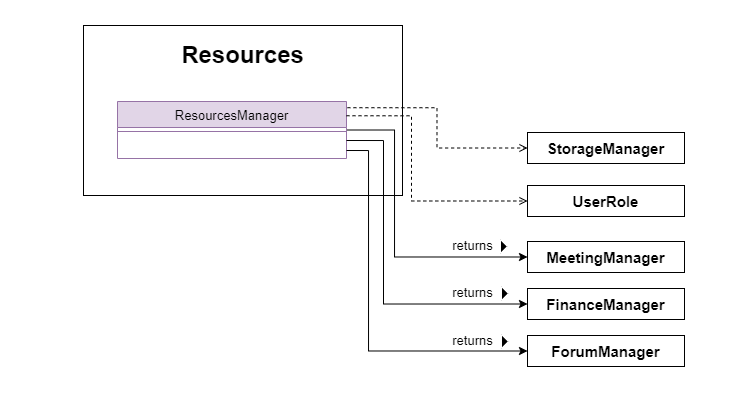
-
The
Resourcescomponent containsResourcesManagerwhich manages access rights to feature managers based onUserRole.-
E.g. the following line will only return a valid reference to
FinanceManagerifuserRole == UserRole.ADMIN. Otherwise,nullwill be returned indicating the user does not have the access right to that module.FinanceManager financeManager = resourcesManager.getFinanceManager(userRole);
-
-
It also implements a give-receive pattern to pass private members of
ResourcesManagerclass toStorageManagersafely. This is becauseStorageManagerhas “super privilege” to access internal data structures of feature managers and save to/ load from hard disk.
The Resources component:
- Returns references of feature managers such as
MeetingManager,FinanceManagerorForumManagerbased onUserRoleof the request body. E.g. Only an admin is able to getFinanceManagersuccessfully. - Returns references to
StorageManagersafely upon request.
Finance
API: cooper.finance
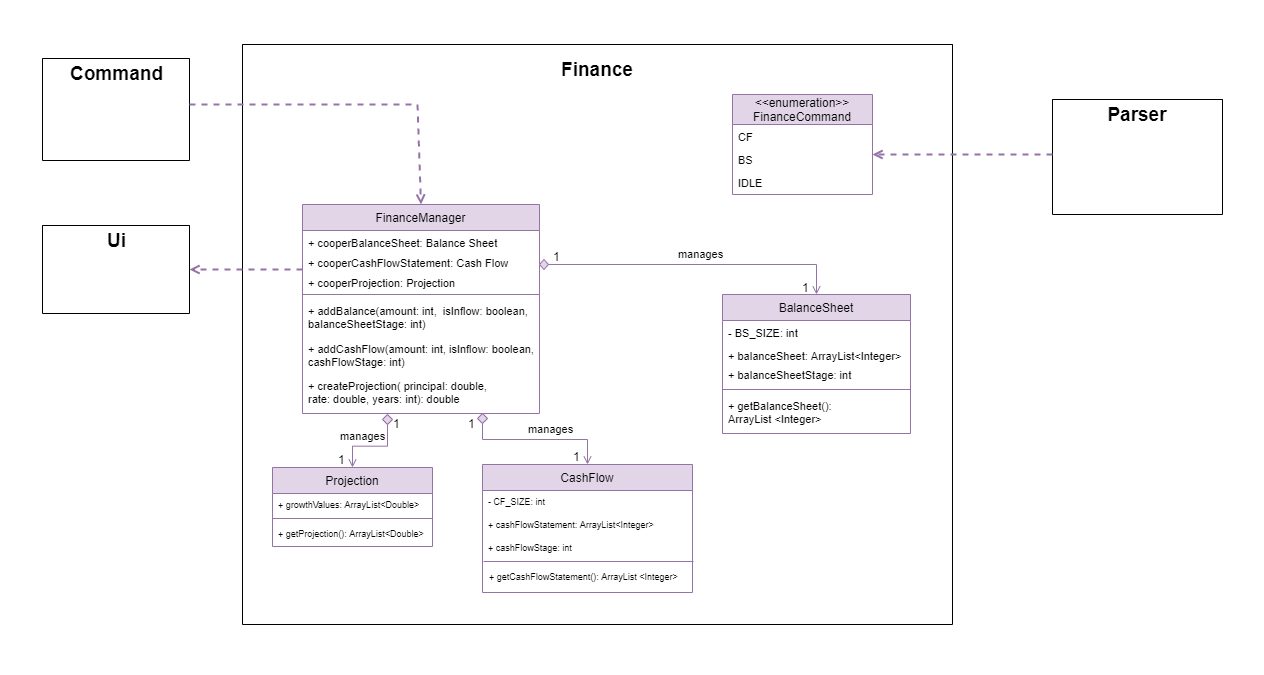
- The
Financecomponent contains theFinanceManager,BalanceSheet,CashFlow, andProjectionclasses, as well as theFinanceCommandenumeration. - The
FinanceManagerconstructs the instances of theBalanceSheet,CashFlowandProjectionfor use, and contains attributes and methods that aid the related functions. - The
FinanceCommamndenum helps theParserto understand whatFinancefunction is being used, with three states:CF,BS, andIDLE. - The
Financecomponent also contains thePdfGeneratorclass (not shown in the diagram above) for thegeneratefeature. More info on this feature can be found here.
The Finance component:
- Handles adding / listing / generating of balance sheets, cash flow statements, and free cash flow projections.
- Assists the parser in identifying which function is being used at any given time.
Meetings
API: cooper.meetings
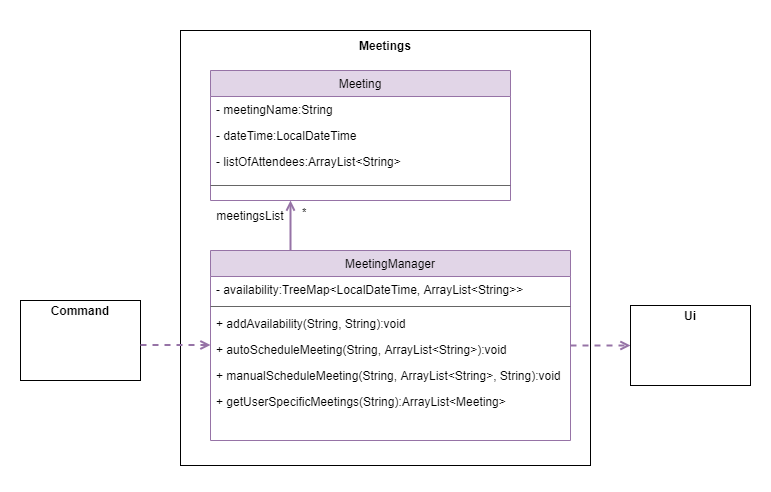
The Meetings component contains the MeetingManager and Meeting classes.
MeetingManager stores two attributes:
- the timings along with the usernames of the available users, which is a
TreeMap<LocalTime, ArrayList<String>>object, - the list of meetings scheduled, which is an
ArrayList<Meeting>object.
The MeetingManager constructs the instances of Meeting, and stores it as an ArrayList<Meeting> in itself.
The Meetings component:
- Handles the declaration of availability
- Assists in the scheduling of meetings
- Lists the current availability and meetings
Forum
API: cooper.forum
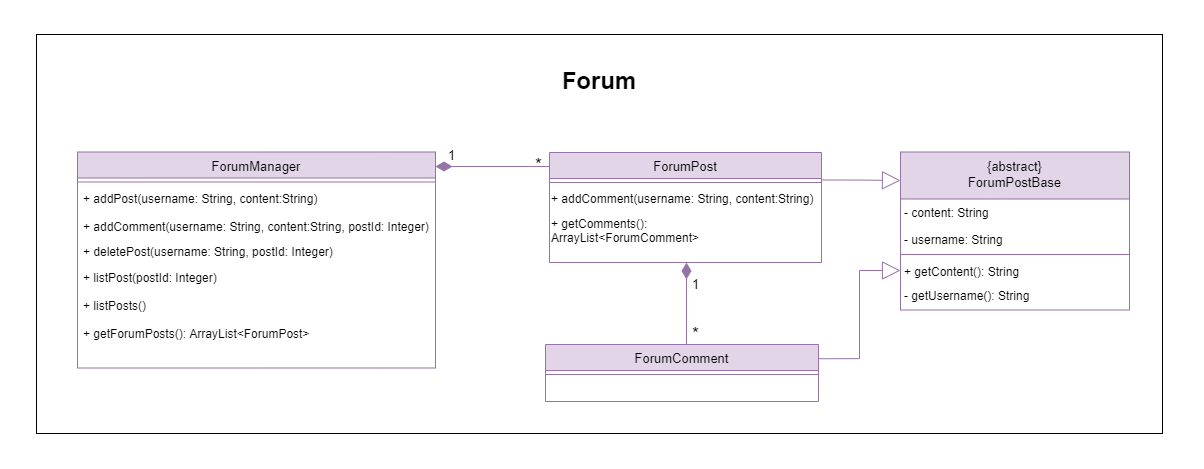
- The
Forumcomponent contains aForumManager,ForumPost,ForumCommentandForumPostBase. BothForumPostandForumCommentare inherited from abstract base classForumPostBaseas they contain the attributescontentandusername. - Forum posts are stored in a hierarchical way where
ForumManagerkeeps a list ofForumPosts and eachForumPostkeeps a list ofForumComments.
The Forum component:
- Handles the adding / deleting / listing of posts and comments
- Deletes a post or comment only if the user requesting the action owns the post or comment, i.e. the
usernameof the request body must match theusernamefield of the post or comment.
Storage Component
API: cooper.storage
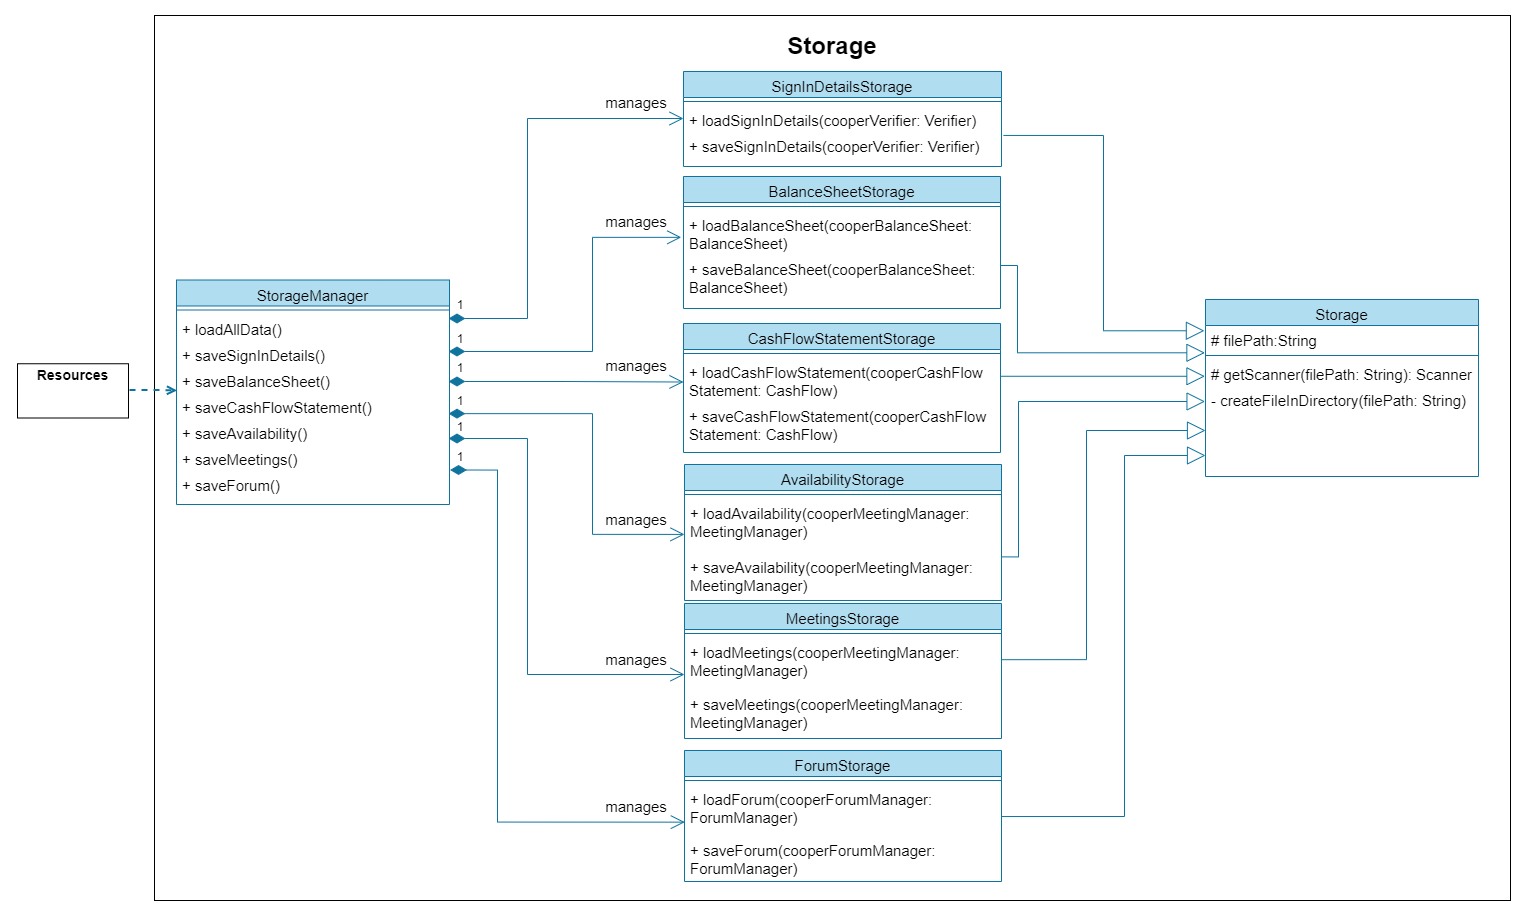
- The
Storagecomponent consists of a parentStorageclass along with its subclasses as shown in the diagram above. - The
Storageclass contains afilePathattribute representing the path of the file where the data is to be stored. It also contains methods common to all its subclasses such asgetScanner()andcreateFileInDirectory()which aid in the process of writing to and creating the storage file. Coopercontains a reference to aStorageManagerobject. ThisStorageManagerobject in turn contains references to each of the subclasses ofStoragewhich store cOOPer’s data in theVerificationandResourcescomponents.
ℹ️We do not put the
StorageManagerclass underResourcesfor the following reasons:
Storageclass is cOOPer’s internal construct for bookkeeping various internal data structures and recovering them at startup. This does not categorise under any features the user can interact with and hence should not be kept underResourcesManager.Storagehas super privileges to access internal data structures of all components inResources. This contradicts the goal ofResourcesManagerwhich is to manage access rights to different features depending on user roles, and hence should be kept separate from it.
The Storage component:
- Loads stored user data from the storage file specified by
filePathinto theVerifier,FinanceManager,MeetingsManagerandForumManagerobjects upon launching the app. - Saves data to the storage file specified by
filePathfrom theVerifier,FinanceManager,MeetingsManagerandForumManagerwhenever a change is made to the data in these objects.
Util Component
API: Util.java
- The
Utilcomponent is a component unrelated to cOOPer and serves mainly as a helper component to make some of cOOPer’s features possible. - There are only two methods in the
Utilclass, namelyinputStreamToTmpFile()andinputStreamToString(). inputStreamToTmpFile()is used to recreate the dopsun chatbot-cli’s training files (originally located insrc/main/resources/parser). In the process of packaging cOOPer into a JAR application, these training files are converted to bytes which are unable to be read in by the chatbot API. Hence, there is a need to recreate these files for the chatbot to work.inputStreamToString()is used for cOOPer’sgeneratefeature which allows the user to generate a PDF file from data in cOOPer’s balance sheet or cash flow statement. This method is used to convert the.textemplate files (located insrc/main/resources/pdf) into aStringobject which can then be handled easily in the code. More details of the implementation can be found here.
Implementation
Parsing user input
cOOPer uses the dopsun chatbot-cli library as its frontend parser that allows you to define any arbitrary input schema under src/main/resources/parser/command-data.properties
such as
login = login ${username-hint} /pw ${password-hint} /as ${role-hint}
The chatbot’s Parser library automatically parses the place-holders defined with $ leaders to strings. For example, login Yvonne /pw 12345 /as admin will be parsed
into the following fields:
{ "username-hint" : Yvonne,
  "password-hint" : 12345,
  "role-hint" : admin }
This gives great flexibility and extensibility to the Parser component as you do not need to worry about writing new parsing schemes for every command and adding new commands to cOOPer for new features become trivial.
Verifying user credentials
The Verifier class facilitates the verification of the credentials of a user registering or logging in to cOOPer.
Verification process
Different conditions are checked depending on whether a user is trying to log in or register. For example, if a user is trying to register, cOOPer will check if the username is already registered and asks the user to log in if they are not registered yet. On the other hand, if an unregistered user is trying to log in, cOOPer will ask the user to register first.
For a registered user trying to log in, cOOPer will first check if the entered password is correct. This is done with the help of the PasswordHasher class which hashes the entered password with the user’s salt stored by cOOPer. The hash obtained will then be compared to the user’s stored hash to determine if the entered password is correct.
If the password is correct, the user’s role will then be checked to determine if they are logging in with the role they registered with.
Registering a user
The following sequence diagram shows the detailed process of registering a user.
ℹ️
userInputisregister John /pw 123 /as admin.
ℹ️TheexecuteSignIn()method actually takes in arawPasswordas its parameters but is omitted in this sequence diagram as the registration process does not require the raw password of the user.
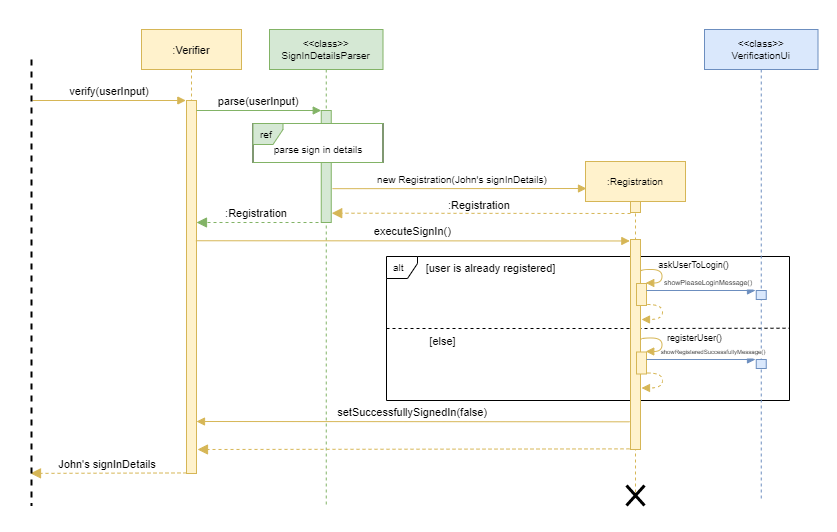
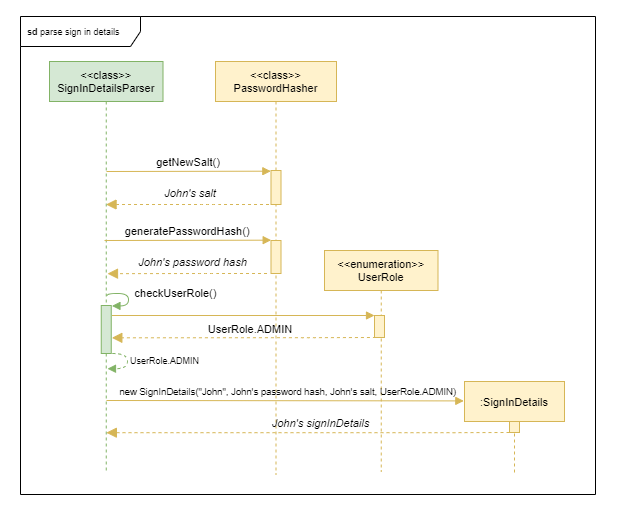
The SignInDetailsParser constructs a SignInDetails object parsed from the arguments in userInput. This SignInDetails object is then used to construct a Registration object which executes the registration of the user. This process is shown by the sequence diagram below.
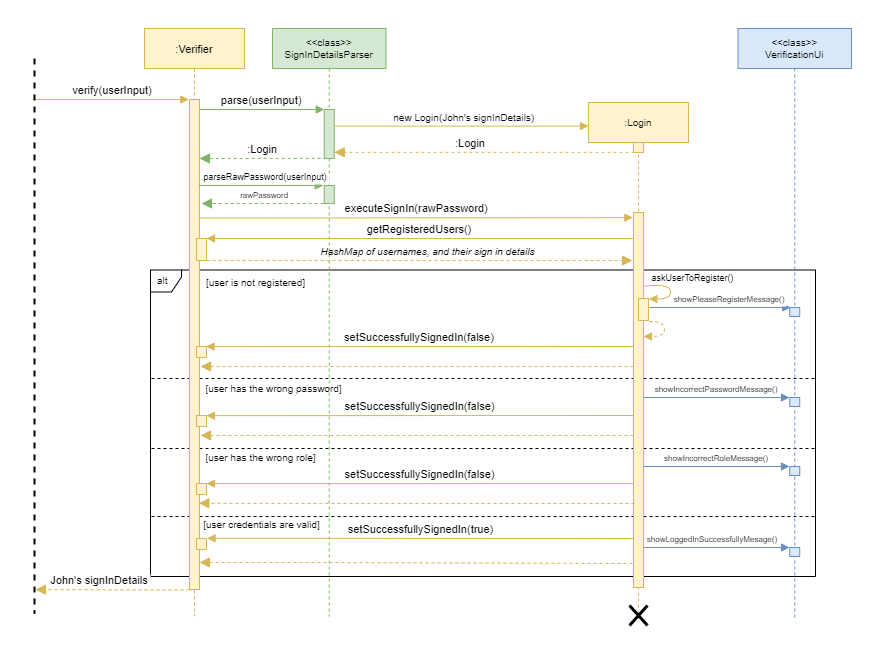
Logging in
Assuming that the above registration has taken place successfully, the following sequence diagram shows the login process of the user.
ℹ️
userInputislogin John /pw 123 /as admin.
ℹ️The process of parsinguserInputtakes place similar to when a user is registering. The reference frame is omitted in this sequence diagram for simplicity.
Hashing user passwords
The Password Based Key Derivation Function (PBKDF2) hashing algorithm is used for hashing user passwords. This algorithm is used together with a 64-bit salt text for each password before it is hashed to improve security and decrease susceptibility to rainbow-table attacks, where duplicate user passwords are still stored securely.
This algorithm is recommended by the National Institute of Standards and Technology (NIST) for password storage and our implementation also adheres to NIST specifications:
- The hashing algorithm is run for 25000 iterations while NIST only specifies a minimum of 10000 iterations.
- A 64-bit salt text is used while NIST specifies a 32-bit salt text.
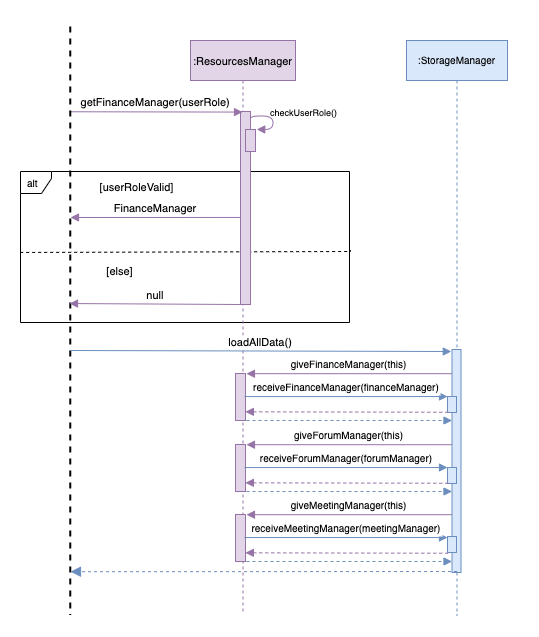
Requesting a resource
The Resources component manages the access rights to other manager components like the FinanceManager, MeetingManager and ForumManager. The following sequence diagram shows the two main operations of ResourcesManager:
- To get a feature manager, such as the
FinanceManager, the user needs to pass in theirUserRole.ResourcesManagerwill check if the user has the right access to the feature and returns the requested object if so, andnullotherwise. - The
StorageManagerclass has “super privilege” to access internal data structure ofFinanceManager,MeetingManagerandForumManager. Private members are passed safely using the give-receive pattern, instead of universalgetters.
Interacting with finance functions
The Finance component provides features such as adding and listing of financial statements, i.e. the balance sheet and cash flow statement as well as compounded projection of Free Cash Flow growth.
Adding to the financial statement
The sequence diagram below illustrates the process of adding to a given financial statement, in this case the balance sheet.
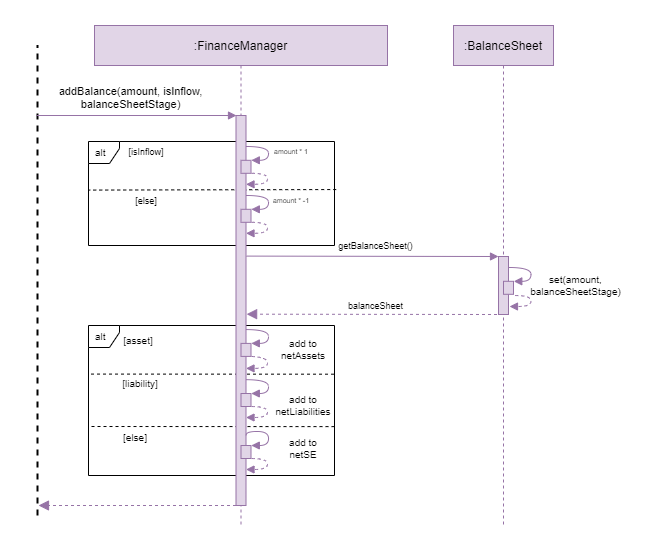
When the user wants to add an entry to a financial statement, FinanceManager will first determine if the amount should reflect as positive or negative in the financial statement, as well as which section of the financial statement the entry belongs to. FinanceManager will then add the entry to the respective financial statement and its section’s net amount.
Viewing the financial statement
When the user wants to view a financial statement with list, FinanceManager will run a check that the net amounts of each section of the financial statement are calculated correctly before the statement is displayed to the output.
Projecting cash flow
When the user wants to project free cash flow, FinanceManager will first help to calculate free cash flow by subtracting the CapEx (Capital Expenditure: a field of the cash flow statement) from the total cash from Operating Activities. Subsequently FinanceManager will compare this value to the previous year’s value, and calculate the percentage increase. This percentage increase will then be used in a recursive periodic compound interest formula to calculate the following year’s free cash flow, at the same percentage increase.
Generating a PDF from the financial statement
The PdfGenerator abstract class is responsible for the generation of the financial statement as a PDF via the generate command. It is inherited by the subclasses, BalanceSheetGenerator and CashFlowStatementGenerator, with each subclass containing different methods to add different sections to the PDF.
Creating the PDF with LaTeX
The PDF is generated with the help of an online LaTeX compiler. The LaTeX (.tex) templates for the PDF can be found under src/main/resources/pdf. The PdfGenerator class employs the use of the inputStreamToString() method of the Util component to convert the contents of these LaTeX templates into a String object. The LaTeX template, which is now a String is then manipulated by calling Java String methods like replace() and append().
Certain identifiers (in the form of LaTeX comments ‘%’) in the LaTeX template will be replaced by the actual values of cOOPer’s financial statement.
The example below shows the template of an entry in the financial statement:
\centering
% {Description}
& \centering
& \centering
& \centering
& % {Amount}
\\[3ex]
Calling replace("% {Description}", "Depreciation and Amortisation") and replace("% {Amount}", 1500) on the template above will result in the following:
\centering
Depreciation and Amortisation
& \centering
& \centering
& \centering
& 1500
\\[3ex]
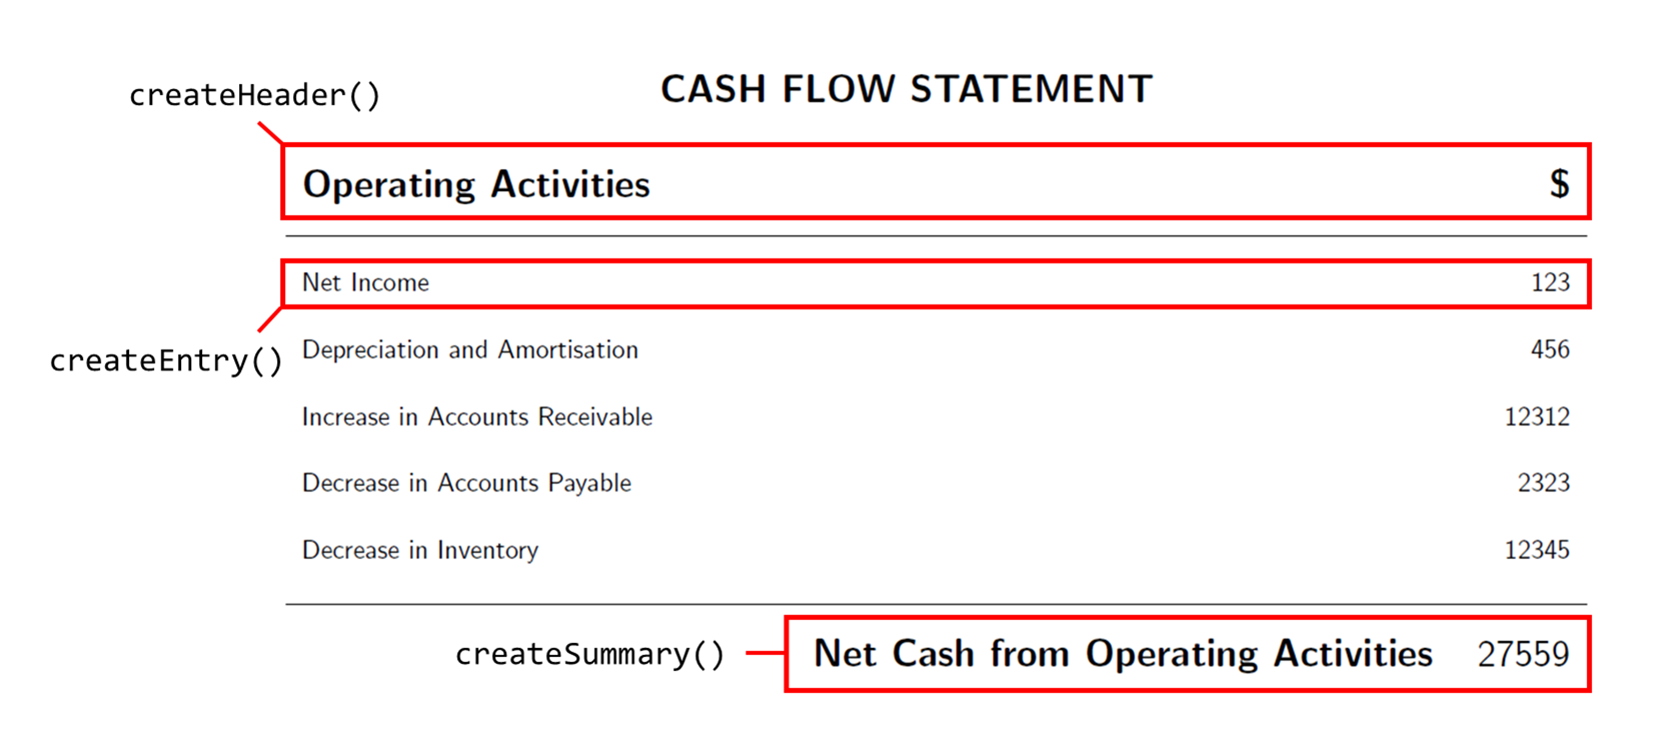
When compiled, the LaTeX code above will correspond to an entry ‘Depreciation and Amortisation’ on the PDF with the amount $1500. This technique can be used on the header and summary templates which will format the header and summary of a particular section in the financial statement.
The methods createHeader(), createEntry() and createSummary() in PdfGenerator perform the text replacement as shown above. The diagram below shows how these methods correspond to the different parts of the ‘Operating Activities’ section in the cash flow statement PDF.
Compiling the LaTeX code online
createHeader(), createEntry() and createSummary() also add the template to an ArrayList after performing the text replacement on the template. Iterating through the ArrayList, these templates are then appended together using append().
This forms a long String which is then sent to the online LaTeX compiler via a POST request. The reply data obtained from the request is used to construct the PDF via the write() method of Java’s FileOutputStream class.
Declaring an availability
The MeetingManager class facilitates the storing of availability in cOOPer.
Availability declaration process
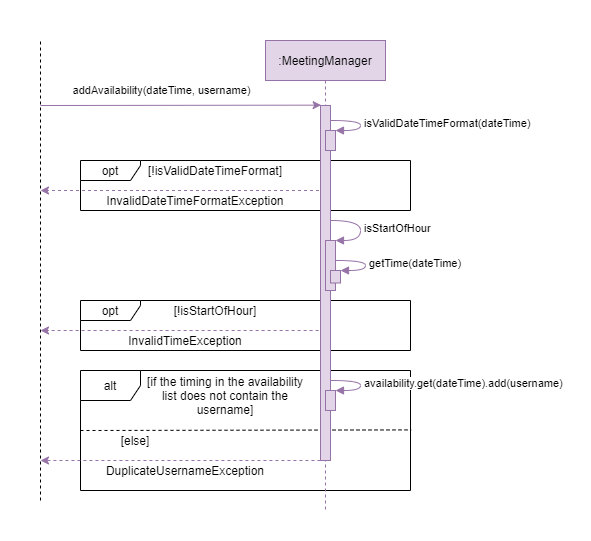
When the user declares an availability, the addAvailability function in MeetingManager performs some checks before successfully storing their availability.
addAvailabilitylooks at the format of the[date]and[time]entered, which will be checked using theisValidDateTimeFormatfunction.addAvailabilitychecks if the time entered is at the start of the hour, using theisStartOfHourfunction.addAvailabilitychecks if the user has already entered their availability under the same date and time, by checking all the names under the specified date and time in theavailabilityTreeMap.
The following sequence diagram shows the detailed process of declaring an availability. username is Sebastian and userInput is available 11-08-2021 14:00.
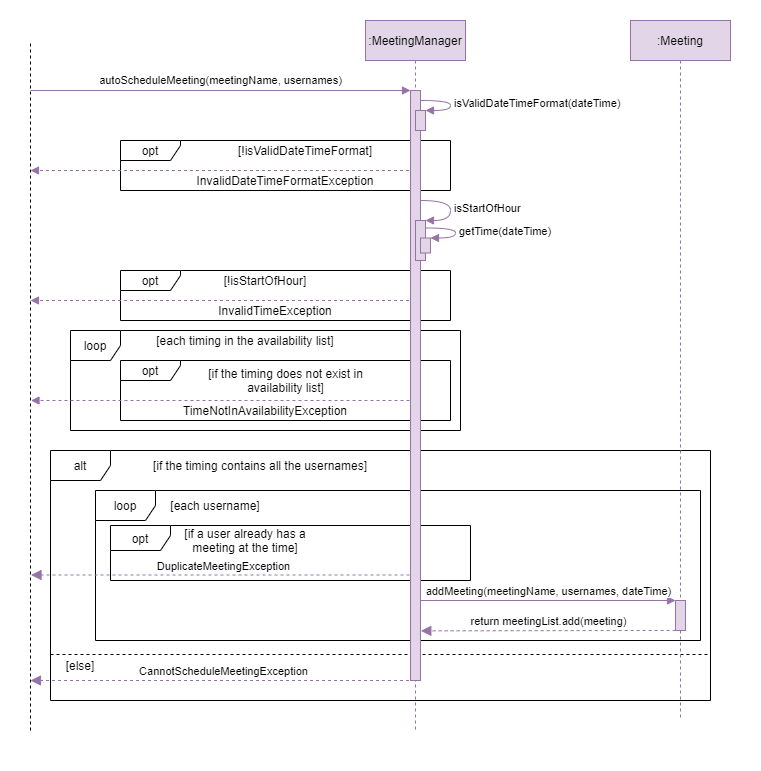
Scheduling a meeting
The MeetingManager class facilitates the scheduling of meetings.
Scheduling process
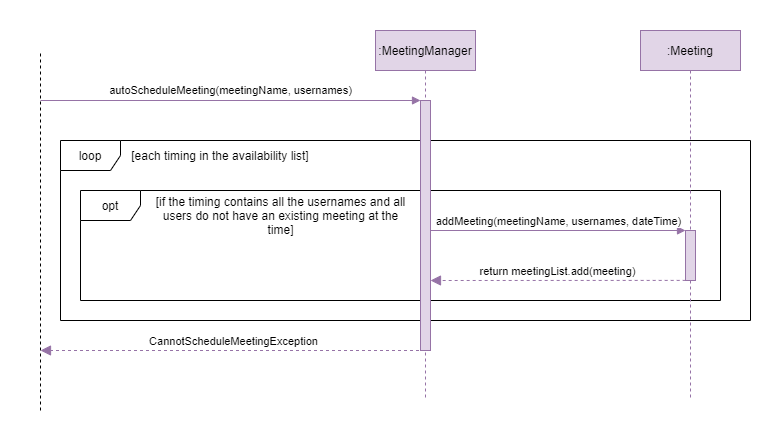
When the user schedules a meeting ScheduleCommand checks if the [date] and [time] parameter is entered and calls manualScheduleMeeting in MeetingManager if it is and autoScheduleMeeting if it isn’t.
The following sequence diagram shows the process of automatically scheduling a meeting. username of the user scheduling is Sebastian and userInput is schedule Project Meeting /with Eugene.
The following sequence diagram shows the process of manually scheduling a meeting. username of the user scheduling is Sebastian and userInput is schedule Project Meeting /with Eugene /at 11-08-2021 14:00.
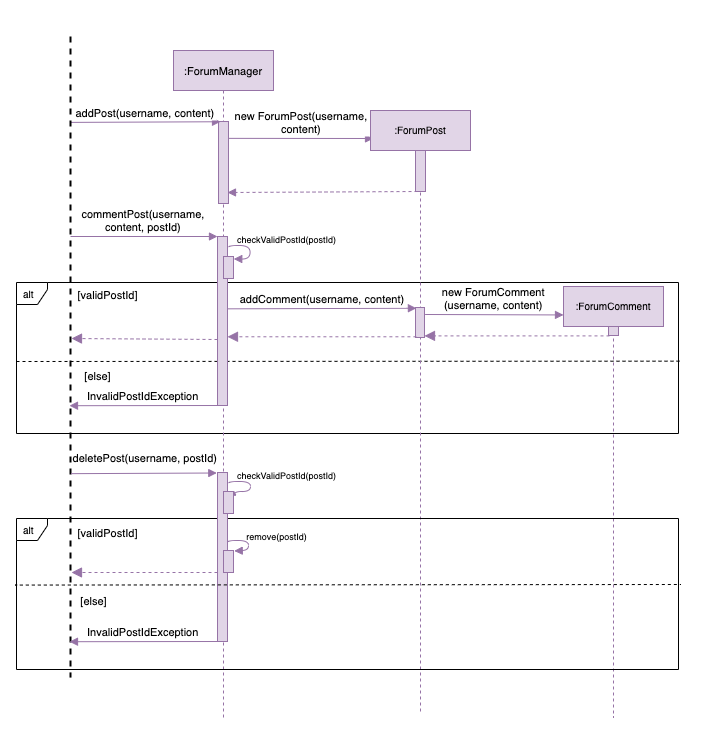
Interacting with the forum
The following sequence diagram shows three operations with the forum, addPost, commentPost and deletePost.
-
For adding a post,
ForumManagerwill create a newForumPostobject and store its username and content. -
For commenting on a post,
ForumManagerwill first check if thepostIdspecified is a valid index. If it is not, an exception will be thrown. Otherwise, it will get theForumPostby itspostIdand add a newForumCommentto it. -
For deleting a post,
ForumManagerwill again check thepostIdand delete the post only if thepostIdis valid.ℹ️ In the actual implementation,
ForumManagerwill also ensure the username of the user requesting for thedeletePostoperation matches the owner of the forum post. This checking is omitted in this sequence diagram for simplicity and represented as the method call toremove(postId).
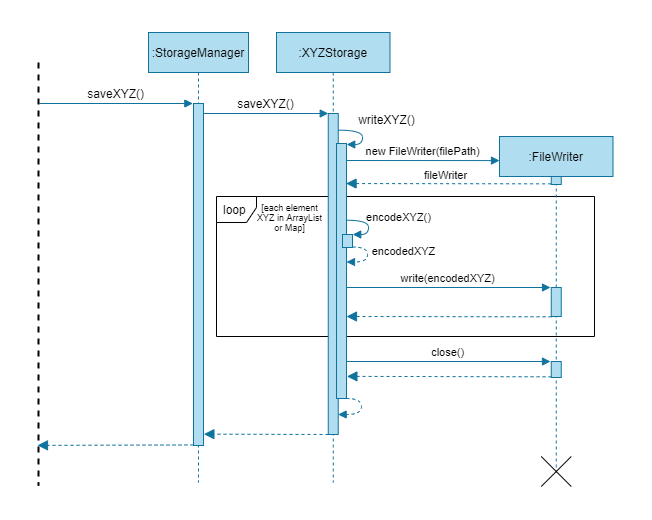
Saving and loading data
ℹ️Due to the way the
Storagecomponent is implemented, the classes and methods used for storage have names which are quite similar. In order to generalize the explanations in this section for how data is saved and loaded, the termXYZwill be used as a placeholder whereXYZissignInDetails,balanceSheet,cashFlowStatement,availability,meetingsandforum.
The StorageManager class facilitates the saving and loading of cOOPer’s data to and from its storage files. This data includes the sign in details of registered users (from the Verification component) , entries of the balance sheet and cash flow statement, list of availabilities, scheduled meetings, and forum posts (all from the Resources component).
cOOPer’s data is stored separately in multiple text files named XYZ.txt located in the ‘cooperData’ folder in the home folder.
Saving data
Certain commands, when executed successfully, can change the data in the Verification and Resources components. (e.g. register, add, available, etc.) Whenever the data in these components change, the command that made the change will call the saveXYZ() method of the StorageManager to update the storage file with the change.
For example, when a new availability is added successfully, the method saveAvailability() is called by AvailableCommand and the storage file is updated with the new list of availabilities.
The following sequence diagram shows the general procedure of saving data to the storage file whenever a change is made.
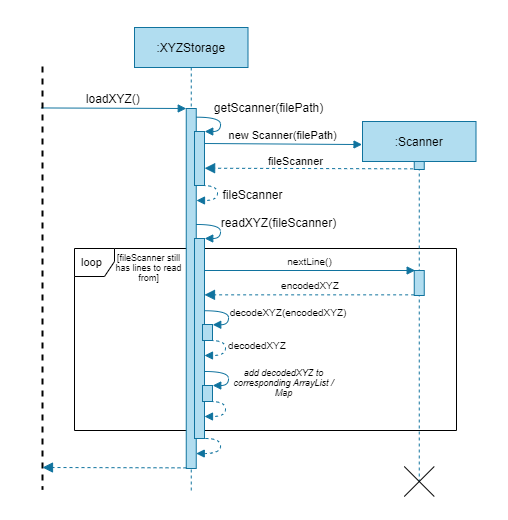
Loading data
Data is loaded from cOOPer’s storage files into the Verification and Resources component upon launching the app. The StorageManager constructor is first called and each subclass XYZStorage is initialized with the file paths of their storage files, XYZ.txt.
The loadAllData() method of StorageManager is then called and this method in turn calls the loadXYZ() methods of the XYZStorage subclasses. If the storage files are not present upon launching cOOPer, the storage files will be created and any error in file creation will be made known to the user.
Since data in the storage files are of a specific format, any change to the storage format will throw an InvalidFileDataException and a message will be printed to specify the file containing invalid data.
The following sequence diagram shows the general procedure of loading data from the storage file upon launching cOOPer.
Storage design considerations
Current choice: Individual subclasses which store the sign in details of registered users, entries of the balance sheet and cash flow statement, list of availabilities, scheduled meetings, and forum posts in separate storage files.
- Pros:
- Easy to implement
- Efficient (only saves the data changed for a specific component, not all)
- Extensible (each subclass follows a certain template for storage)
- Cons:
- Some methods are duplicated (e.g.
saveXYZ(),loadXYZ(), etc.)
- Some methods are duplicated (e.g.
Appendix: Requirements
Product scope
Target user profile
The target user profile of cOOPer consists of all levels of administration in a tech startup, namely from the employee level of Secretary up to the management level of CEO.
Example Users:
- has a need to schedule company meetings in timely manner
- has a need to generate and store financial statements
- has a need to raise timely concerns to management
- has a need to perform reliable company growth projections
- comfortable with typing interactions on a CLI
Value proposition
cOOper’s value proposition: Manage company financials faster than typical human accounting means & manage company communication more reliably than a typical GUI driven app.
User Stories
💡 Priorities: High (must have) -
***, Medium (nice to have) -**, Low (unlikely to have) -*
| Priority | As a … | I want to … | So that I can … |
|---|---|---|---|
*** |
new user | see usage ‘help’ instructions | refer to them when I forget how to use the application |
*** |
new user | register an account | login and return to my saved work at any point later on |
*** |
user | see a list of roles at login | login to the specific role I need to carry out a task |
*** |
user | have a password encrypted login | have my saved work be protected from any external tampering |
*** |
finance admin | create the company’s financial statements | assess the company’s current financial health accurately and quickly |
*** |
secretary employee | see all company personnel’s daily availability | schedule meetings between all available members easily |
** |
finance admin | automatically generate projections on the company’s yearly profitability | assess the company’s potential future growth |
** |
finance admin | generate the company’s financial statements as a PDF document | view and share a neat version of the financial statement with my colleagues |
** |
employee | make posts on a company forum | discuss difficulties or interesting developments in the company |
** |
employee | add my available timings for meetings | ease the scheduling of meetings with my colleagues |
** |
secretary employee | automatically schedule a meeting without having to know other person’s availability | save time on finding an appropriate time to meet |
* |
user in a hurry | customise shortcut keys in the app | save time on retrieving the data I desire |
Non-Functional Requirements
- Should work on any mainstream OS with Java 11 or above installed.
- Should be able to store up to 100 meetings, forum posts, and financial statements without observing any noticeable sluggishness in performance.
- Should log in and enter user-specific roles faster than traditional web-applications.
- A user with average typing speed should be able to accomplish meeting scheduling and forum posting faster and more reliably using commands than using a mouse interaction GUI driven app.
- A user with average typing speed should also be able to accomplish financial statement creation faster than by human means or a mouse interaction GUI driven app.
Glossary
- IDE - Integrated Development Environment
- JDK - Java Development Kit
- UML - Unified Modelling Language
- API - Application Programming Interface
- give-receive pattern - A Java implementation of the ‘friend’ concept in C++
- POST Request - A request used to send data to a server to create / update a resource
- mainstream OS - Windows, OS-X, Linux, Unix
Appendix: Instructions for Manual Testing
Launch and shutdown
- Launching cOOPer
- Download cOOPer’s latest JAR file here and copy the JAR file into an empty folder.
- Launch the Command Prompt / Terminal from the folder.
- Check the Java version being used by entering
java -version. Ensure that you are using Java 11 or above. - Run
java -jar cOOPer.jar.
Expected output: cOOPer’s greeting message is shown.
- Exiting cOOPer
- Enter
exit.
Expected output: cOOPer’s bye message is shown and the program exits successfully.
- Enter
Sign-in
- Registering
- Ensure that the label beside cOOPer’s command prompt shows
[Logged out]. - Enter
register [username] /pw [password] /as [role]where[username]is your username,[password]is your password and[role]is one of ‘admin’ or ‘employee’.
Expected output: A message informing you that you have successfully registered is shown.
- Ensure that the label beside cOOPer’s command prompt shows
- Logging in
- Ensure that the label beside cOOPer’s command prompt shows
[Logged out]. - Enter
login [username], /pw [password] /as [role]where[username],[password]and[role]are the username, password and role you registered with.
Expected output: A message informing you that you are now successfully logged in is shown. The[Logged out]label at the command prompt is no longer present.
- Ensure that the label beside cOOPer’s command prompt shows
Viewing help
- Viewing help
- Ensure that you are logged in to cOOPer.
- Enter
help.
Expected output: A list of commands specific to your role is shown along with their formats.
Finance actions
- Creating the balance sheet
- Ensure that you are logged in as an admin.
- Enter
bsto initiate the balance sheet function. - Ensure that the label beside the command prompt shows
[Balance Sheet]. - Enter
add [amount]to add the first entry.
Expected output: You will be prompted by cOOPer for the next entry. - Repeat step iv until cOOPer prompts you to enter
listupon completion of the balance sheet.
- Viewing the balance sheet
- Ensure that you are logged in as an admin.
- Enter
bsto initiate the balance sheet function. - Ensure that the label beside the command prompt shows
[Balance Sheet]. - Enter
listto view the current balance sheet.
Expected output: All entries will be displayed with the respective net amounts, as well as a check for if the sheet balances.
- Creating the cash flow statement
- Ensure that you are logged in as an admin.
- Enter
cfto initiate the cash flow statement function. - Ensure that the label beside the command prompt shows
[Cash Flow]. - Enter
add [amount]to add the first entry.
Expected output: You will be prompted by cOOPer for the next entry. - Repeat step iv until cOOPer prompts you to enter
listupon completion of the cash flow statement.
- Viewing the cash flow statement
- Ensure that you are logged in as an admin.
- Enter
cfto initiate the cash flow statement function. - Ensure that the label beside the command prompt shows
[Cash Flow]. - Enter
listto view the current cash flow statement.
Expected output: All entries will be displayed with the respective net amounts.
- Generating cash flow projections
- Ensure that you are logged in as an admin.
- Ensure all the fields of the cash flow statement have been filled using
cf→add. - Enter
proj [years]to project up to your specified number of years.
Expected output: All the projected values of free cash flow will be displayed up to the specified year.
Generating the PDF
The generate command works regardless of whether the prompt label is showing [Balance Sheet], [Cash Flow] or is not even present.
- Generating the balance sheet
- Ensure that you are logged in as an admin.
- Fill up the balance sheet with
bs→add. - Ensure that you have an active Internet connection.
- Enter
generate bs.
Expected output: A message informing you that the PDF has been successfully generated is shown. A PDF named ‘BalanceSheet.pdf’ is created in a folder named ‘output’ in the folder containing the JAR file.
- Generating the cash flow statement
- Ensure that you are logged in as an admin.
- Fill up the cash flow statement with
cf→add. - Ensure that you have an active Internet connection.
- Enter
generate cf.
Expected output: A message informing you that the PDF has been successfully generated is shown. A PDF named ‘CashFlowStatement.pdf’ is created in a folder named ‘output’ in the folder containing the JAR file.
Meetings actions
- Declaring availability
- Ensure that you are logged in to cOOPer.
- Enter
available [date in dd-MM-yyyy] [time in HH:mm].
Expected output: A confirmation informing you that your username has been added to the date and time is shown.
- Viewing availability
- Ensure that you are logged in to cOOPer.
- Enter
availability.
Expected output: A table with the availability of all users is shown.
- Scheduling meeting
- Ensure that you are logged in to cOOPer.
- Ensure that you and one or more users have entered their availability at a common date and time.
- Enter
schedule [meetingName] /with [username].[username]is a user(not you) who is available in at least one common date and time as you. - Alternatively, you can also enter
schedule [meetingName] /with [username] /at [date] [time].[username]and yourself must be both available at this date and time.
Expected output: A confirmation message informing you that the meeting is successfully scheduled is shown.
- Viewing meetings
- Ensure that you are logged in to cOOPer.
- Enter
meetings.
Expected output: A table with all your meetings, their date and time, and their attendees is shown.
Forum actions
- Adding a post
- Ensure that you are logged in to cOOPer.
- Enter
post add hello world.
Expected output: A box with the post you just added is shown as confirmation.
- Commenting on a post
- Ensure that you are logged in to cOOPer.
- Ensure you have added at least one post.
- Enter
post comment hello world 2 /on 1.
Expected output: A box with the post and your comment you just entered is shown as confirmation.
- Deleting a post
- Ensure that you are logged in to cOOPer.
- Ensure you have added at least one post.
- Enter
post delete 1.
Expected output: A box with the post you just deleted is shown as confirmation.
- Listing all posts
- Ensure that you are logged in to cOOPer.
- Ensure you have added at least one post.
- Enter
post list all.
Expected output: A box containing all posts and comments you have entered so far is shown.
Logging out
- Logging out
- Ensure that you are logged in to cOOPer.
- Enter
logout. Expected output: A message informing you that you have logged out of cOOPer is shown along with the instructions on how to log in, register or exit. The label at the command prompt now shows[Logged out].