cOOPer
Eugene Chong - Project Portfolio Page
Overview
cOOPer is a Command Line Interface (CLI) desktop application developed to simplify administrative processes of tech startups such as communication and finance management.
cOOPer was developed in Java following an Object-Oriented Programming (OOP) paradigm, hence the letters OOP in its name.
Summary of Contributions
Code Contributed
All the code I contributed for this project can be found at this RepoSense link.
Enhancements Implemented
- Feature 1: Implemented the sign-in system for cOOPer
- This feature is what the user sees first upon launching cOOPer.
- It allows cOOPer’s users to sign in to cOOPer with a username, password as well as the role they hold in the startup.
- Since users have different access to different features of cOOPer based on their role in the startup, this feature ensures the correct level of access is given to its users within the startup throughout cOOPer’s usage.
- This feature also ensures that cOOPer’s users experience something similar to having a personal account with cOOPer. For example, cOOPer’s meetings feature allows the user logged in at the moment to view a list of meetings specific to them.
- This feature has a reasonable level of security, with the implementation of a NIST recommended algorithm, the Password Based Key Derivation Function (PBKDF2) hashing algorithm with salt, for storing user passwords. The additional usage of salt makes user passwords insusceptible to rainbow-table attacks, hence more secure in the event that cOOPer’s users have duplicate passwords.
- Feature 2: Implemented the
generatefeature- This feature generates one of cOOPer’s financial statements (balance sheet or cash flow statement) as a LaTeX-formatted PDF document.
- This feature allows the user to view a neatly-formatted financial statement which may not always be possible when using a CLI.
- The PDF document is generated with the help of an online LaTeX compiler, and in the event that there is no Internet connection while using this feature, a backup text file is created representing the LaTeX file used to create the PDF.
- I worked together with @Rrraaaeee on this feature, who came up with the code for sending a POST Request to the online LaTeX compiler. He also came up with the base LaTeX template for the PDF, and I made enhancements to the template which formatted the PDF like an actual financial statement.
- Feature 3: Implemented the storage feature for cOOPer
- The storage feature saves and loads user data to and from storage files.
- Some methods for this feature was reused from my CS2113T Individual Project (iP) as well as the idea of encoding and decoding objects into strings which can be written to and read from text files.
- I came up with the ‘template’ for each of the
Storageclasses which each had aload()andsave()method as well as aencode()anddecode()method. - This storage feature also does error checking of the content in the storage files to ensure that the correct data is being loaded into cOOPer.
Contributions to the User Guide
- Contribution 1: Documented the ‘Getting Started’ and ‘Login’ section
- Provided explanations and steps to start using cOOPer. e.g. provided instructions on how cOOPer is to be used, as well as how user roles are determined
- Provided steps for registering and logging in as a user of cOOPer.
- Contribution 2: Documented the
generatefeature- Since I implemented this feature, I explained the steps to use this feature, as well as additional information for users regarding the online LaTeX compilation.
- Contribution 3: Documented the storage feature
- Provided explanations to the user on things like what is stored in each storage file, as well as when the storage file is updated throughout cOOPer’s usage.
- Contribution 4: Documented the ‘Setup’ section
- Provided a beginner-friendly, step-by-step walkthrough for the user to set up cOOPer properly.
- Contribution 5: Documented other minor features like
helpandexit- Provided explanations on how to use these commands.
-
Contribution 6: Added some questions to the ‘FAQ’ section
- Contribution 7: Came up with the ‘How This User Guide Works’ section
- Created a table explaining the different formatting / symbols used in the user guide so that readers are able to use the guide with ease.
Contributions to the Developer Guide
- Contribution 1: Documented the ‘Setting Up and Getting Started’ section
- Provided instructions for developers to set up cOOPer correctly.
- Contribution 2: Came up with the layer diagram, architecture diagram and sequence diagrams under the ‘Design’ section
- Briefly explained cOOPer’s internal software architecture / design.
- Contribution 3: Documented the
Ui,Parser,Verification, andStoragecomponents under the ‘Design’ section- Came up with the class diagrams and explanations about the design of these components.
- Contribution 4: Documented the ‘Verifying user credentials’, ‘Generating a PDF from the financial statement’ and ‘Saving and loading data’ features under the ‘Implementation’ section
- Came up with explanations and sequence diagrams for the implementation of these features.
- Contribution 5: Came up with the ‘How This Developer Guide Works’ section
- Created a table explaining the different formatting / symbols used in the developer guide
- Contribution 6: Added the
generate,helpand ‘Launch and Shutdown’ sections to manual testing- Provided steps on how to test these features.
Contribution to Team-based Tasks
- Maintained the issue tracker. (added issues, labels, milestones, proper descriptions etc.)
- Set soft deadlines for project tasks.
- Set date / time for team meetings.
- Inspected / ran IDE analysis on code after merges to determine if there are any parts of the code which need cleaning up. (unused variables, unused methods etc.)
- Added the ‘⬆️Back to top’ labels in both the User Guide and Developer Guide for easier navigation.
- Tested the JAR for all the releases on my Linux VM.
- Did the v1.0 and v2.0 releases.
- Troubleshoot CI-related problems.
Review/mentoring contributions
- Pull requests I reviewed:
- Helped @ChrisLangton resolve Git-related issues, as well as demonstrated usage of Git’s stash feature.
- Helped @fansxx solve the Git password authentication problem.
- Provided tips to configure IntelliJ to not automatically use wildcard imports.
- Helped to test code written by my teammates.
- Helped my teammates fix bugs.
Contributions beyond the project team
[Optional] Contribution to the User Guide
Here is an extract of one of my contributions to the User Guide:
Getting Started
This section explains how you can register an account with cOOPer in order to gain access to cOOPer’s features.
How cOOPer is to be used
- The correct way (as of v2.1) of using cOOPer is to run cOOPer on a single desktop with only a single user interacting with cOOPer at a time.
⚠️cOOPer’s features will not work as described in this user guide if multiple users are interacting with cOOPer on multiple desktops at the same time.
Roles
There are two main roles you can hold as a user of cOOPer, namely the admin role or the employee role.
You are eligible to hold the admin role if you hold a high position in the startup. e.g. Chief Executive Officer (CEO), Chief Financial Officer (CFO), Human Resources Manager (HR), accountant etc.
On the other hand, you hold the employee role if you are a basic employee at the startup.
cOOPer offers tailor-made functions and features specific to your role to ensure the correct level of administrative access within the company throughout cOOPer’s usage.
User registration
Upon first-time use of cOOPer, ensure that all members of the startup are registered with the correct role.
Once a member has been registered, they will be able to log in to cOOPer to access its features.
How to register a user:
- When you see the
[Logged out]label beside cOOPer’s prompt, enterregister [username] /pw [password] /as [role].- Upon successful registration, you should see a message informing you of your successful registration.
- You can now log in to access cOOPer’s features specific to your role. Refer to the Login section to find out more about logging in.
ℹ️
[username]refers to your name,[password]refers to your password, while[role]refers to your role as determined here.
- Example input:
>> [Logged out] register Sebastian /pw 123 /as admin
- Expected output:
=========================================================================
Sebastian is now successfully registered as an admin!
=========================================================================
ℹ️A similar output should be observed when an employee is registered, with the output now showing ‘employee’ instead of ‘admin’.
💡 Just like when you are using any other app with a sign in feature, remember to record down your username and password somewhere (e.g. Sticky Notes, a password manager).
[Optional] Contribution to the Developer Guide
Here is an extract of one of my contributions to the Developer Guide:
Design
💡 The architecture diagram and UML diagrams in this document were created using draw.io. The
.pngtemplates used to create the diagrams can be found in thedeveloperGuideDiagramsfolder. To create and edit diagrams, access the draw.io website, select ‘Open Existing Diagram’ and open the desired.pngfile. Any changes to the diagram will be saved automatically.Overview
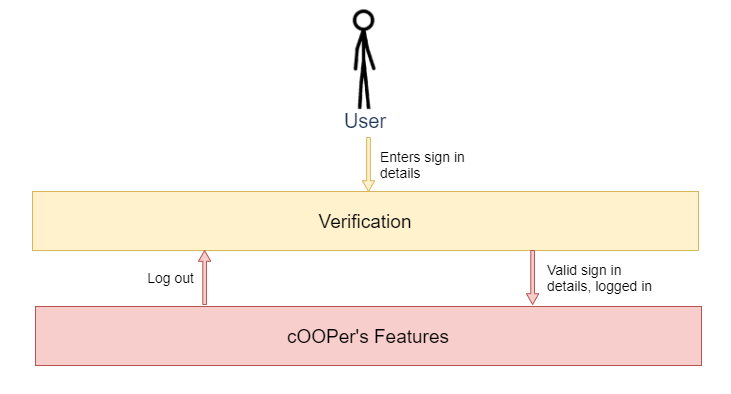
cOOPer consists of two main layers: the verification layer and the features layer as shown in the diagram below. cOOPer recognizes different sets of inputs at each layer.
Upon launching the app, the user starts at the verification layer where they can only log in or register. Entering valid credentials will then grant the user access to the features layer where they can input commands like
cfandavailableto use cOOPer’s features. At this layer, entering thelogoutcommand will bring the user back to the verification layer.Architecture
The Architecture Diagram above shows the high-level design of cOOPer and how cOOPer’s components are connected.
Coopercontains the main method of the program.Cooper’s responsibilities are as such:
- Upon launching the app,
Cooperinitializes the components and loads stored user data into the components.- While the app is running,
Cooperreads user input which is then processed by the components to produce a result.- Upon shutting down the app,
Coopershuts down the components and performs cleaning up where necessary.Apart from
Cooper, the rest of the app consists of these seven components:
Ui: Handles the reading of user input and printing of messages to the terminal.Parser: Interprets and validates user input.Verification: Verifies that the user is signing in to cOOPer with valid credentials.Command: Executes commands which are parsed from user input.Resources: Manages data for cOOPer’s finance, meetings and forum features while the app is running.Storage: Loads data from, and saves data to storage files in the computer hard disk.Util: Provides utility which help with some of cOOPer’s features.Interaction of the architecture components to process user input
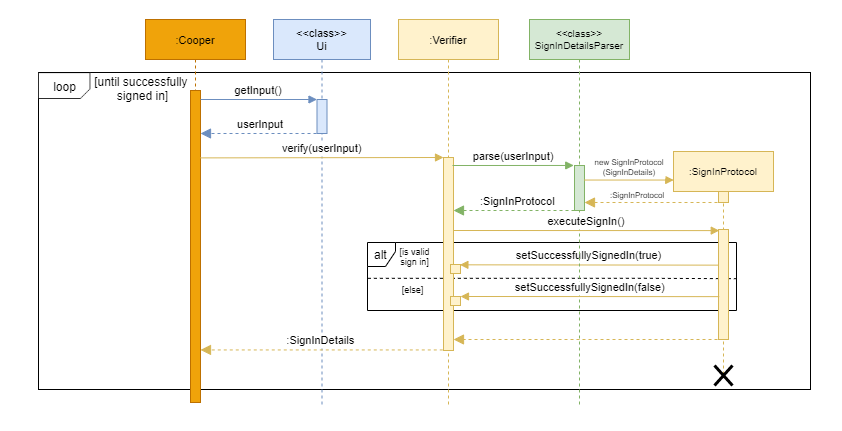
- The sequence diagram below provides a general overview of how cOOPer’s components interact with each other when a user enters their sign in details at the verification layer.
ℹ️
userInputrepresents the credentials input by the user for verification. For example,register John /pw 12345 /as admin.
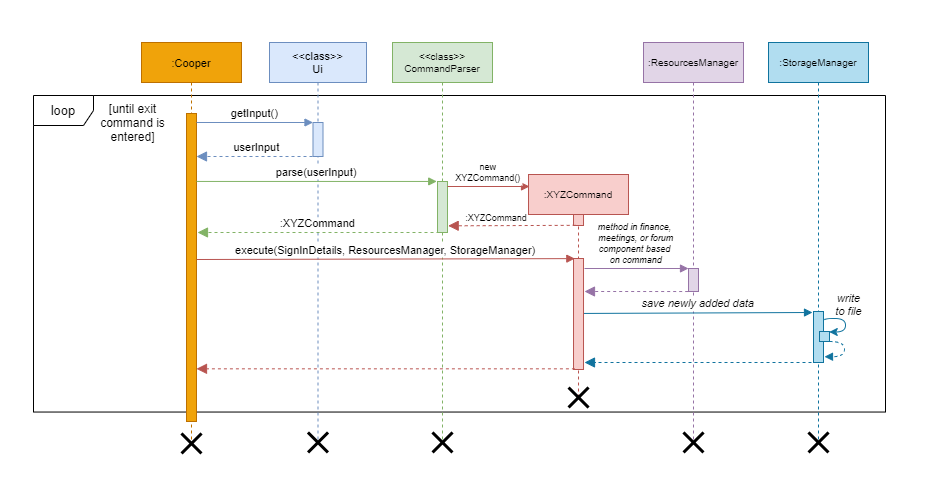
- The next sequence diagram below provides a general overview of how cOOPer’s components interact with each other when a user enters a command at the features layer.
ℹ️
userInputrepresents a command input by the user. For example,meetings.
ℹ️XYZCommandis an object representing a command recognised by cOOPer. For example,MeetingCommand.


